0%

HBase

最佳实践

避免数据热点

加盐的过程本质上是对原有的主键加上一个字节的前缀,
如下面公式所示:
new_row_key = (++index % BUCKETS_NUMBER) + original_key

BUCKETS_NUMBER 为桶的个数。主键的分布决定了数据的分布,把主键
打散也就意味着数据打散。具体使用时,一般建议桶的数目等于 RegionServer 的
数目。

多租户

我们开发了 DHS 系统(Didi HBase Service)进行项目管理,并且在 HBase 上通过 Namespace、RS Group 等技术来分割用户的资源、数据和权限。通过计算开销并计费的方法来管控资源分配

HBase 自带的 jxm 信息会汇总到 Region 和 RegionServer 级别的数据,管理员会经常用到,但是用户却很少关注这个级别。根据这种情况我们开发了 HBase 表级别的监控,并且会有权限控制,让业务 RD 只能看到和自己相关的表,清楚自己项目表的吞吐及存储占用情况

RegionServer Group,实现细节可以参照 HBase HBASE-6721 这个 Patch。滴滴在这个基础上作了一些分配策略上的优化,以便适合滴滴业务场景的修改。RS Group简单概括是指通过分配一批指定的RegionServer列表,成为一个RS Group,每个 Group 可以按需挂载不同的表,并且当 Group 内的表发生异常后,Region不会迁移到其他的 Group。这样,每个 Group 就相当于一个逻辑上的子集群,通过这种方式达到资源隔离的效果,降低管理成本,不必为每个高 SLA 的业务线单独搭集群。

HDFS中文件的存储

Browsing HDFS for HBase Objects

1
/hbase/data/default/<table_name>/ab0ba9f7e0d2898a0f61aa687d3d4886/<column_family>/<HFile_name>

1
/hbase/data/default/my_table/d177ff7276d2e46d69dc50f67f92643a/cf/

HFile每bulkload一次,新增加的HFile序列号增加1

1
2
3
4
 ./hadoop fs -ls /hbase/data/default/recommend_result/d177ff7276d2e46d69dc50f67f92643a/cf
Found 2 items
-rw-rw-rw- 3 tdw_hectorhe g_cdg_cft_data__cft 2791972087 2019-04-11 07:06 /hbase/data/default/recommend_result/d177ff7276d2e46d69dc50f67f92643a/cf/accd28866e6d40738849b4efb08ea154_SeqId_312_
-rw-r--r-- 3 hbaseadmin users 2941438650 2019-04-11 04:07 /hbase/data/default/recommend_result/d177ff7276d2e46d69dc50f67f92643a/cf/ee29f8ad0fa14f508793108234242de4

如上面的seqId_1,代表序列号为1,在major compact时,将合并成一个文件

如果存在多个HFile,就需要同时查询多个列族。

  1. 一个region只保存在一个region server中,不会跨越region server,由hdfs保证高可用

client写入

通过client写入数据时,首先会把数据写入到memstore和WAL,数据到达一定的阈值,才会溢写到StoreFile,StoreFile也就是HFile

zk存储

hbase meta

1
2
3
4
5
6
hbase(main):053:0> list_namespace_tables 'hbase'
TABLE
meta
namespace
rsgroup
3 row(s) in 0.0040 seconds

GET的过程

Coprocessor

Phoenix

在没有 Phoenix 之前,用户如果需要分析 HBase 数据,只能从 HBase 拖出去或者绕过 HBase 直接读取 HDFS 上面的HFile 的方式进行,前者浪费了大量的网络IO,后者用不到 HBase 本身做的大量缓存和索引优化。Phoenix 使用 HBase 的协处理器机制,直接在 RegionServer 上执行算子逻辑,然后将算子的结果返回即可,也就是大数据中的“Move Operator to Data”理念。比如,用户执行“ select count(*) from mytable where mytime > timestamp’2018-11-11 0:00:00’ ”,在实际执行中,会先找到符合过滤条件的region,然后在RegionServer本地计算count,最后再对各个 Region 上的结果进行汇总。

索引是传统数据库中常见的技术,HBase 表中可以指定主键,对主键使用 LSM 算
法构建索引。Phoenix 中,用户在创建表的时候,可以指定索引列,可以是单列,
也可以是组合列。很多时候仅有主键索引是不够的,特别是对于列特别多的宽表,
为此,Phoenix 提供二级索引功能,用户能够对表中非主键的列添加索引,并可
以加入其它相关列到索引表中,如果某个查询涉及到的列全部在索引表中,直接
查询索引表即可,无需访问原数据表。索引表跟原表做到实时同步更新,以保证
数据一致性。

imooc

@Controller
@SessionAttributes({ “credentials”, “user” })

shell

HFile文件的元数据

1
2
3
4
5
6
7
8
9
10
11
12
13
14
15
16
17
18
19
20
21
22
23
24
25
26
27
28
29
30
31
32
33
34
35
36
37
38
39
40
41
42
43
44
45
46
47
48
49
50
51
52
53
54
hdfs dfs -du -h /hbase/data/default/dal_hx_lct_700_800/999fdd6a2ed426fcb33d202195fdd7d2/i/
16.0 G /hbase/data/default/dal_hx_lct_700_800/999fdd6a2ed426fcb33d202195fdd7d2/i/0e950ca090d54eb2b98abffc2e285cfa_SeqId_4_
16.0 G /hbase/data/default/dal_hx_lct_700_800/999fdd6a2ed426fcb33d202195fdd7d2/i/bfc0c2e4fae84ba19ad1eaf78ea04967_SeqId_4_
16.0 G /hbase/data/default/dal_hx_lct_700_800/999fdd6a2ed426fcb33d202195fdd7d2/i/e5f3675a6b0040faa695ec3b35b2e951_SeqId_4_
6.1 G /hbase/data/default/dal_hx_lct_700_800/999fdd6a2ed426fcb33d202195fdd7d2/i/f5c2d2461e0f4eb58ed6c75aa1ae9ffa_SeqId_4_


hbase hfile -m -f /hbase/data/default/dal_hx_lct_700_800/999fdd6a2ed426fcb33d202195fdd7d2/i/0e950ca090d54eb2b98abffc2e285cfa_SeqId_4_

2020-03-18 14:19:37,389 INFO [main] hfile.CacheConfig: Created cacheConfig: CacheConfig:disabled
Block index size as per heapsize: 5288
reader=/hbase/data/default/dal_hx_lct_700_800/999fdd6a2ed426fcb33d202195fdd7d2/i/0e950ca090d54eb2b98abffc2e285cfa_SeqId_4_,
compression=none,
cacheConf=CacheConfig:disabled,
firstKey=0632079511/i:v/1584411652893/Put,
lastKey=0938227441/i:v/1584411652893/Put,
avgKeyLen=23,
avgValueLen=1837,
entries=9189138,
length=17212333944
Trailer:
fileinfoOffset=17212333262,
loadOnOpenDataOffset=17212330707,
dataIndexCount=73,
metaIndexCount=0,
totalUncomressedBytes=17207143638,
entryCount=9189138,
compressionCodec=NONE,
uncompressedDataIndexSize=9529760,
numDataIndexLevels=2,
firstDataBlockOffset=0,
lastDataBlockOffset=17212236283,
comparatorClassName=org.apache.hadoop.hbase.KeyValue$KeyComparator,
majorVersion=2,
minorVersion=3
Fileinfo:
BULKLOAD_SOURCE_TASK = attempt_20200317094633_0002_r_000001_0
BULKLOAD_TIMESTAMP = \x00\x00\x01p\xE6\x81\x87\xD0
DELETE_FAMILY_COUNT = \x00\x00\x00\x00\x00\x00\x00\x00
EARLIEST_PUT_TS = \x00\x00\x01p\xE6K3\x1D
EXCLUDE_FROM_MINOR_COMPACTION = \x00
KEY_VALUE_VERSION = \x00\x00\x00\x01
MAJOR_COMPACTION_KEY = \xFF
MAX_MEMSTORE_TS_KEY = \x00\x00\x00\x00\x00\x00\x00\x00
TIMERANGE = 1584411652893....1584411652893
hfile.AVG_KEY_LEN = 23
hfile.AVG_VALUE_LEN = 1837
hfile.LASTKEY = \x00\x0A0938227441\x01iv\x00\x00\x01p\xE6K3\x1D\x04
Mid-key: \x00\x09078540676\x00\x7F\xFF\xFF\xFF\xFF\xFF\xFF\xFF\xFF
Bloom filter:
Not present
Delete Family Bloom filter:
Not present

WAL

写入模型优化

WAL写入模型

了解了HLog的结构之后,我们就开始研究HLog的写入模型。HLog的写入可以分为三个阶段,首先将数据对<HLogKey,WALEdit>写入本地缓存,然后再将本地缓存写入文件系统,最后执行sync操作同步到磁盘。在以前老的写入模型中,上述三步都由工作线程独自完成,如下图所示:

103

上图中,本地缓存写入文件系统那个步骤工作线程需要持有updateLock执行,不同工作线程之间必然会恶性竞争;不仅如此,在Sync HDFS这步中,工作线程之间需要抢占flushLock,因为Sync操作是一个耗时操作,抢占这个锁会导致写入性能大幅降低。

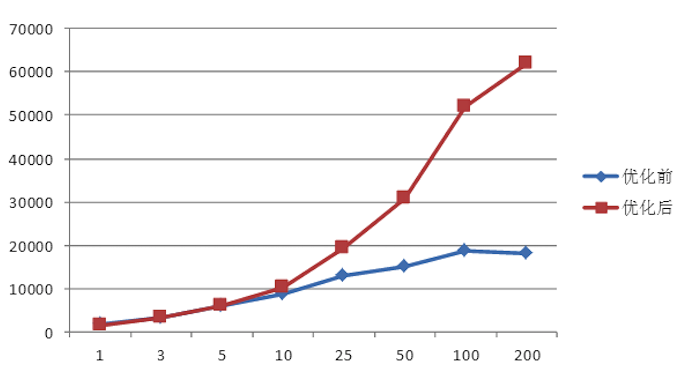
所幸的是,来自中国(准确的来说,是来自小米,鼓掌)的3位工程师意识到了这个问题,进而提出了一种新的写入模型并被官方采纳。根据官方测试,新写入模型的吞吐量比之前提升3倍多,单台RS写入吞吐量介于12150~31520,5台RS组成的集群写入吞吐量介于22000~70000(见HBASE-8755)。下图是小米官方给出来的对比测试结果:

104

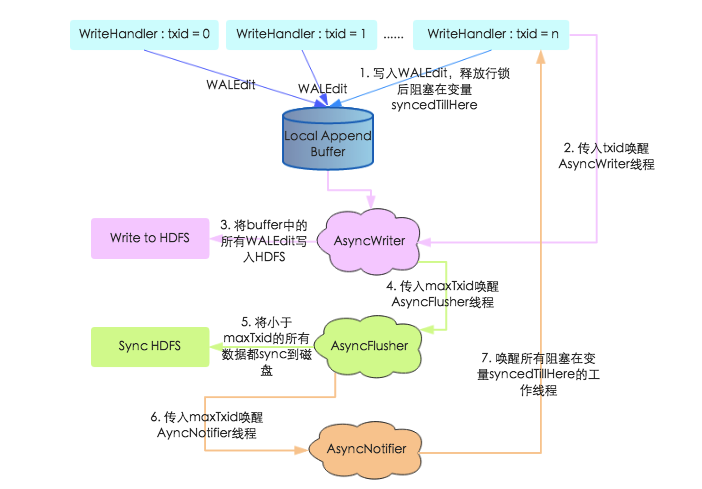
在新写入模型中,本地缓存写入文件系统以及Sync HDFS都交给了新的独立线程完成,并引入一个Notify线程通知工作线程是否已经Sync成功,采用这种机制消除上述锁竞争,具体如下图所示:

105

1. 上文中提到工作线程在写入WALEdit之后并没有进行Sync,而是等到释放行锁阻塞在syncedTillHere变量上,等待AsyncNotifier线程唤醒。

2. 工作线程将WALEdit写入本地Buffer之后,会生成一个自增变量txid,携带此txid唤醒AsyncWriter线程

3. AsyncWriter线程会取出本地Buffer中的所有WALEdit,写入HDFS。注意该线程会比较传入的txid和已经写入的最大txid(writtenTxid),如果传入的txid小于writteTxid,表示该txid对应的WALEdit已经写入,直接跳过

4. AsyncWriter线程将所有WALEdit写入HDFS之后携带maxTxid唤醒AsyncFlusher线程

5. AsyncFlusher线程将所有写入文件系统的WALEdit统一Sync刷新到磁盘

6. 数据全部落盘之后调用setFlushedTxid方法唤醒AyncNotifier线程

7. AyncNotifier线程会唤醒所有阻塞在变量syncedTillHere的工作线程,工作线程被唤醒之后表示WAL写入完成,后面再执行MVCC结束写事务,推进全局读取点,本次更新才会对用户可见

通过上述过程的梳理可以知道,新写入模型采取了多线程模式独立完成写文件系统、sync磁盘操作,避免了之前多工作线程恶性抢占锁的问题。同时,工作线程在将WALEdit写入本地Buffer之后并没有马上阻塞,而是释放行锁之后阻塞等待WALEdit落盘,这样可以尽可能地避免行锁竞争,提高写入性能。

wal写入数据写入经历三步:

  1. 写入本地缓存
  2. 写入hdfs
  3. flush hdfs

旧的写入模型,工作线程自己写入hdfs和flush,为了避免一致性问题,需要分别竞争updateLock和flushLock, 工作线程在单个线程中完成,写了hdfs,立即直接flush

新的写入模型,将写hdfs和flush hdfs分别由两个单独的线程(AsyncWriter和AsyncFlusher)处理,落盘后回调工作线程;
为了避免多个线程同时写入冲突,给每个要写入的文件生成一个自增的txid,写hdfs的线程会把所有的文件全部写入到hdfs,
如果工作线程要写的txid小于max txid,代表已经写过了。

memstore

MSLAB

LAB 对 GC 的优化

ConcurrentSkipListMap

CompactingMemStore

HBase clonesnapshot 限流实现原理

scanner

数据存储压缩

org.apache.hadoop.hbase.util.Bytes

#data-compress

#byte

构建一个打印字节数组的工具方法:

1
2
3
4
5
6
7
8
9
10
11
12
13
14
15
16
17
18
19
20
21
22
23
24
25
26
27
28
29
30
31
  
import java.nio.charset.StandardCharsets;

class Scratch {
public static void main(String[] args) {
System.out.println(toBinaryString(hbaseToBytes(1230L)));
System.out.println(toBinaryString("0".getBytes(StandardCharsets.UTF_8)));
}


public static byte[] hbaseToBytes(long number) {
byte[] b = new byte[8];
for (int i = 7; i > 0; --i) {
System.out.println((int) number);
b[i] = (byte) ((int) number);
number >>>= 8;
}
b[0] = (byte) ((int) number);
return b;
}

public static String toBinaryString(byte[] bytes) {
StringBuilder sb = new StringBuilder();
for (int i = 0; i < bytes.length; i++) {
sb.append("[").append(bytes.length - 1 - i).append("]:")
.append(Integer.toBinaryString(bytes[i] & 0xFF))
.append("\n");
}
return sb.toString();
}
}

  • NameNode 保存这个文件的数据块信息
  • DataNode 存储实际的文件
  • 当MR启动的时候,首先获取所要处理的文件的块信息和节点信息,然后在这些节点上同时启动任务,在数据所在节点上同时处理

MapReduce是底层编程语言,您需要专业知识才能在此级别工作。工程师在Map Reduce上开发了一个名为Hive的层,以便用户可以使用SQL来处理HDFS中存储的数据。Hive将这些SQL查询转换为一系列Map Reduce,然后调度执行。因此,Hive极大地简化了数据处理任务。但是Hive使用底层Map Reduce体系结构,这是用于处理数据的另一层

Impala 一旦部署在Hadoop集群中,它将在每个数据节点上运行自己的进程,并完全跳过MapReduce阶段。一旦收到一个SQL,Impala master节点调度数据所在的节点上直接执行任务。因为它跳过MapReduce转换阶段并直接在节点上执行,所以它可以完成每秒钟的SQL查询

当您在Hive中启动查询时,在背景地图中,Reduce会出现在启动查询需要花费大量时间的画面中,就像您在Impala中启动查询一样,它使用自己的体系结构,即MPP(大规模并行处理)而不是Map Reduce来从HDFS获取结果。它在内存中执行查询,总是比磁盘快。

It’s an HDFS quirk. A file that’s currently being written to will appear to have a size of 0 but once it’s closed it will show its true size

flink-table-api

Hippo和Tube如何实现重放?

FlinkHippoConsumer

举一反三

构建并行数据流的基础类,在执行时,运行时将执行与源配置的并行一样多的该函数的并行实例。

一行数据

1
Object[]  fields

Flink AsyncApiScalaSink

andrew建议:

  • onCompeleted没有把IOException暴露给用户
  • 链接配置之类的参数如何传递进去
  • 反压机制如何做?sink经常遇到的问题,下游抖动会直接导致数据丢失
  • 反压 限流 重试
  • 支持batch,条数控制
  • checkpoint时,需要batch立即flush出去

Http Client

1
2
3
4
5
6
7
8
9
10
11
12
13
14
15
16
17
18
19
20
21
22
23
24
25
26
27
28
29
30
31
32
33
34
35
<dependency>
<groupId>org.apache.httpcomponents</groupId>
<artifactId>httpclient</artifactId>
<version>4.5.2</version>
<exclusions>
<exclusion>
<artifactId>commons-logging</artifactId>
<groupId>commons-logging</groupId>
</exclusion>
</exclusions>
</dependency>

<dependency>
<groupId>org.apache.httpcomponents</groupId>
<artifactId>httpcore</artifactId>
<version>4.4.5</version>
</dependency>

<dependency>
<groupId>org.apache.httpcomponents</groupId>
<artifactId>httpcore-nio</artifactId>
<version>4.4.5</version>
</dependency>

<dependency>
<groupId>org.apache.httpcomponents</groupId>
<artifactId>httpasyncclient</artifactId>
<version>4.1.2</version>
<exclusions>
<exclusion>
<artifactId>commons-logging</artifactId>
<groupId>commons-logging</groupId>
</exclusion>
</exclusions>
</dependency>

AsyncApiScalaSink

1
2
3
4
5
6
7
8
9
10
11
12
13
14
15
16
17
18
19
20
21
22
23
24
25
26
27
28
29
30
31
32
33
34
35
36
37
38
39
40
41
42
43
44
45
46
47
48
49
50
51
52
53
54
55
56
57
58
59
60
61
62
63
64
65
66
67
68
69
70
71
72
73
74
75
76
77
78
79
import java.io.IOException
import java.util

import org.apache.flink.configuration.Configuration
import org.apache.flink.streaming.api.functions.sink.{RichSinkFunction, SinkFunction}
import org.apache.http._
import org.apache.http.client.entity.UrlEncodedFormEntity
import org.apache.http.client.methods.{HttpEntityEnclosingRequestBase, HttpPost}
import org.apache.http.concurrent.FutureCallback
import org.apache.http.impl.client.DefaultConnectionKeepAliveStrategy
import org.apache.http.impl.nio.client.{CloseableHttpAsyncClient, HttpAsyncClients}
import org.apache.http.message.BasicNameValuePair
import org.apache.http.util.EntityUtils

class AsyncApiScalaSink[E](httpInvoker: HttpInvoker[E]) extends RichSinkFunction[E] {


var httpClient: CloseableHttpAsyncClient = _

override def open(parameters: Configuration): Unit = {
httpClient = HttpAsyncClients.custom.setKeepAliveStrategy(DefaultConnectionKeepAliveStrategy.INSTANCE).build
httpClient.start()
}

override def invoke(value: E, context: SinkFunction.Context[_]): Unit = {
var httpEntity: HttpEntityEnclosingRequestBase = null
val method: String = httpInvoker.getMethod
val url: String = httpInvoker.getUrl
if ("GET" == method) {
}
else if ("POST" == method) {
val params1: util.Map[String, String] = httpInvoker.getParams(value)
val params: util.List[NameValuePair] = new util.ArrayList[NameValuePair]
if (params1 != null) {
import scala.collection.JavaConversions._
for (entry <- params1.entrySet) {
val key: String = entry.getKey
val value1: String = entry.getValue
params.add(new BasicNameValuePair(key, value1))
}
}
val entity: UrlEncodedFormEntity = new UrlEncodedFormEntity(params, Consts.UTF_8)
httpEntity = new HttpPost(url)
httpEntity.setEntity(entity)
}

httpClient.execute(httpEntity, new FutureCallback[HttpResponse]() {
override def completed(response: HttpResponse): Unit = {
val statusLine: StatusLine = response.getStatusLine
val httpStatusCode: Int = statusLine.getStatusCode
var content: String = null
try {
val entity: HttpEntity = response.getEntity
content = EntityUtils.toString(entity)
} catch {
case e: IOException =>
System.err.print(e.getMessage)
}
httpInvoker.onCompleted(value, httpStatusCode, content)
}

override

def failed(ex: Exception): Unit = {
httpInvoker.onFailed(value, ex)
}

override

def cancelled(): Unit = {
httpInvoker.onCanceled(value)
}
})
}

override def close(): Unit = {
httpClient.close()
}
}

HttpInvoker

1
2
3
4
5
6
7
8
9
10
11
12
13
14
15
16
import java.io.Serializable;
import java.util.Map;

public interface HttpInvoker<E> extends Serializable {
Map<String, String> getParams(E e);

String getMethod();

String getUrl();

void onCompleted(E value, int httpStatusCode, String content);

void onFailed(E value, Exception ex);

void onCanceled(E value);
}

flink-table-api

Hippo和Tube如何实现重放?

FlinkHippoConsumer

举一反三

构建并行数据流的基础类,在执行时,运行时将执行与源配置的并行一样多的该函数的并行实例。

一行数据

1
Object[]  fields

MiniCluster 的启动流程

从本地模式 MiniCluster 的启动流程,分析 Flink 的具体启动流程以及内部各组件之间的交互形式。
MiniCluster 可以看做是内嵌的 Flink 运行时环境,所有的组件都在独立的本地线程中运行。
MiniCluster 的启动入口在 LocalStreamEnvironment#execute(jobName) 中。
其基本的相关的主要类图和 actor 模型如下:

MiniCluster#start 启动源码中,启动流程大致分为三个阶段:

  • 初始化配置信息、创建一些辅助的服务,如 RpcServiceHighAvailabilityServicesBlobServerHeartbeatServices
  • 启动 ResourceManagerTaskManager
  • 启动 Dispatcher

这些服务的用途是啥?

在 MiniCluster 中,其集群中的各个角色分配及作用如下:

  1. ResouceManager
    1. 负责容器的分配
    2. 使用 FencedAkkaRpcActor 实现,其 rpcEndpointorg.apache.flink.runtime.resourcemanager.ResourceManager
  2. JobMaster
    1. 负责任务执行计划的调度和执行,
    2. 使用 FencedAkkaRpcActor 实现,其 rpcEndpointorg.apache.flink.runtime.jobmaster.JobMaster
      1. JobMaster 持有一个 SlotPoolActor,用来暂存 TaskExecutor 提供给 JobMaster 并被接受的 slot
      2. JobMasterScheduler 组件从这个 SlotPool 中获取资源以调度 jobtask
  3. Dispatcher
    1. 主要职责是接收从 Client 端提交过来的 job 并生成一个 JobMaster 去负责这个 job 在集群资源管理器上执行。
      1. 不是所有部署方式都需要用到 dispatcher,比如 yarn-cluster 的部署方式可能就不需要。
    2. 使用 FencedAkkaRpcActor 实现,其 rpcEndpointorg.apache.flink.runtime.dispatcher.StandaloneDispatcher
  4. TaskExecutor
    1. TaskExecutor 会与 ResouceManagerJobMaster 两者进行通信。
      1. 会向 ResourceManager 报告自身的可用资源;并维护本身 slot 的状态
      2. 根据 slot 的分配结果,接收 JobMaster 的命令在对应的 slot 上执行指定的 task
      3. TaskExecutor 还需要向以上两者定时上报心跳信息。
    2. 使用 AkkaRpcActor 实现,其 rpcEndpointorg.apache.flink.runtime.taskexecutor.TaskExecutor
1
2
3
4
5
6
7
8
9
10
11
12
13
14
15
16
17
18
19
20
21
22
23
24
25
26
27
28
29
30
31
32
33
34
35
36
37
38
39
40
41
42
43
44
45
46
47
48
49
50
51
52
53
54
55
56
57
58
59
60
61
62
63
64
65
66
67
68
69
70
71
72
73
74
75
76
77
78
79
80
81
82
83
84
85
86
87
88
89
90
91
92
93
94
95
96
97
98
99
100
101
102
103
104
105
106
107
108
109
110
111
112
113
114
115
116
117
118
119
120
121
122
123
124
125
126
127
128
129
130
131
132
133
134
135
136
137
138
139
140
141
142
143
144
145
146
147
148
149
150
151
152
153
154
155
156
157
158
159
160
161
162
163
164
165
166
167
168
169
170
171
172
173
174
175
176
177
178
179
180
181
182
183
184
185
186
187
188
189
190
191
192
193
194
195
196
197
198
199
200
201
202
203
204
205
206
207
208
209
210
211
212
/*
* Starts the mini cluster, based on the configured properties.
* @throws Exception This method passes on any exception that occurs during the startup of the mini cluster.
*/
public void start() throws Exception {
synchronized (lock) {
checkState(!running, "FlinkMiniCluster is already running");

LOG.info("Starting Flink Mini Cluster");
LOG.debug("Using configuration {}", miniClusterConfiguration);

// MiniCluster初始化配置信息
final Configuration configuration = miniClusterConfiguration.getConfiguration();
final Time rpcTimeout = miniClusterConfiguration.getRpcTimeout();
final int numTaskManagers = miniClusterConfiguration.getNumTaskManagers();
final boolean useSingleRpcService = miniClusterConfiguration.getRpcServiceSharing() == RpcServiceSharing.SHARED;

try {
// 初始化fs write or dir是否允许over_write
initializeIOFormatClasses(configuration);

LOG.info("Starting Metrics Registry");
// 创建指标监控服务
metricRegistry = createMetricRegistry(configuration);
this.jobManagerMetricGroup = MetricUtils.instantiateJobManagerMetricGroup( //
metricRegistry,
"localhost",
ConfigurationUtils.getSystemResourceMetricsProbingInterval(configuration));

final RpcService jobManagerRpcService;
final RpcService resourceManagerRpcService;
final RpcService[] taskManagerRpcServices = new RpcService[numTaskManagers];

// bring up all the RPC services
// 根据conf信息 构建对应的rpc服务 (本地运行的话 rpc服务是通用的 适用于多个服务)
LOG.info("Starting RPC Service(s)");

// we always need the 'commonRpcService' for auxiliary calls
commonRpcService = createRpcService(configuration, rpcTimeout, false, null);

// TODO: Temporary hack until the metric query service is ported to the RpcEndpoint
metricQueryServiceActorSystem = MetricUtils.startMetricsActorSystem(
configuration,
commonRpcService.getAddress(),
LOG);
metricRegistry.startQueryService(metricQueryServiceActorSystem, null);

// rpc服务是否可share
if (useSingleRpcService) {
for (int i = 0; i < numTaskManagers; i++) {
taskManagerRpcServices[i] = commonRpcService;
}

jobManagerRpcService = commonRpcService;
resourceManagerRpcService = commonRpcService;

this.resourceManagerRpcService = null;
this.jobManagerRpcService = null;
this.taskManagerRpcServices = null;
} else {
// start a new service per component, possibly with custom bind addresses
final String jobManagerBindAddress = miniClusterConfiguration.getJobManagerBindAddress();
final String taskManagerBindAddress = miniClusterConfiguration.getTaskManagerBindAddress();
final String resourceManagerBindAddress = miniClusterConfiguration.getResourceManagerBindAddress();

jobManagerRpcService = createRpcService(configuration, rpcTimeout, true, jobManagerBindAddress);
resourceManagerRpcService = createRpcService(configuration, rpcTimeout, true, resourceManagerBindAddress);

for (int i = 0; i < numTaskManagers; i++) {
taskManagerRpcServices[i] = createRpcService(
configuration, rpcTimeout, true, taskManagerBindAddress);
}

this.jobManagerRpcService = jobManagerRpcService;
this.taskManagerRpcServices = taskManagerRpcServices;
this.resourceManagerRpcService = resourceManagerRpcService;
}

// create the high-availability services
// 构建ha高可用服务
LOG.info("Starting high-availability services");
haServices = HighAvailabilityServicesUtils.createAvailableOrEmbeddedServices(
configuration,
commonRpcService.getExecutor());

// 构建分布式文件存储服务
blobServer = new BlobServer(configuration, haServices.createBlobStore());
blobServer.start();

// 心跳服务
heartbeatServices = HeartbeatServices.fromConfiguration(configuration);

// bring up the ResourceManager(s)
// 启动构建ResourceManger服务及其内部组件,主要托管给resourceManagerRunner类,其内部持有ResourceManger实例;
// 并启动ResourceManager#start()以此来启动资源管理器的服务
LOG.info("Starting ResourceManger");
resourceManagerRunner = startResourceManager(
configuration,
haServices,
heartbeatServices,
metricRegistry,
resourceManagerRpcService,
new ClusterInformation("localhost", blobServer.getPort()),
jobManagerMetricGroup);

// 构建分布式存储服务
blobCacheService = new BlobCacheService(
configuration, haServices.createBlobStore(), new InetSocketAddress(InetAddress.getLocalHost(), blobServer.getPort())
);

// bring up the TaskManager(s) for the mini cluster
LOG.info("Starting {} TaskManger(s)", numTaskManagers);
taskManagers = startTaskManagers( // 启动对应数量的TaskManager
configuration,
haServices,
heartbeatServices,
metricRegistry,
blobCacheService,
numTaskManagers,
taskManagerRpcServices);

// starting the dispatcher rest endpoint
LOG.info("Starting dispatcher rest endpoint.");

dispatcherGatewayRetriever = new RpcGatewayRetriever<>(
jobManagerRpcService,
DispatcherGateway.class,
DispatcherId::fromUuid,
20,
Time.milliseconds(20L));

final RpcGatewayRetriever<ResourceManagerId, ResourceManagerGateway> resourceManagerGatewayRetriever = new RpcGatewayRetriever<>(
jobManagerRpcService,
ResourceManagerGateway.class,
ResourceManagerId::fromUuid,
20,
Time.milliseconds(20L));

// 注册开启rest web服务端(主要是RestServerEndpoint)
// 其会web端的JobSubmitHandler(供web端进行job任务的提交)
// 之后便会对web端的所有REST接口服务进行handler注册(主要包括web页面展示的job、metric、checkpoint、savepoint等等)
this.dispatcherRestEndpoint = new DispatcherRestEndpoint(
RestServerEndpointConfiguration.fromConfiguration(configuration),
dispatcherGatewayRetriever,
configuration,
RestHandlerConfiguration.fromConfiguration(configuration),
resourceManagerGatewayRetriever,
blobServer.getTransientBlobService(),
WebMonitorEndpoint.createExecutorService(
configuration.getInteger(RestOptions.SERVER_NUM_THREADS, 1),
configuration.getInteger(RestOptions.SERVER_THREAD_PRIORITY),
"DispatcherRestEndpoint"),
new AkkaQueryServiceRetriever(
metricQueryServiceActorSystem,
Time.milliseconds(configuration.getLong(WebOptions.TIMEOUT))),
haServices.getWebMonitorLeaderElectionService(),
new ShutDownFatalErrorHandler());

dispatcherRestEndpoint.start();

restAddressURI = new URI(dispatcherRestEndpoint.getRestBaseUrl());

// bring up the dispatcher that launches JobManagers when jobs submitted
LOG.info("Starting job dispatcher(s) for JobManger");

final HistoryServerArchivist historyServerArchivist = HistoryServerArchivist.createHistoryServerArchivist(configuration, dispatcherRestEndpoint);

//
dispatcher = new StandaloneDispatcher(
jobManagerRpcService,
Dispatcher.DISPATCHER_NAME + UUID.randomUUID(),
configuration,
haServices,
resourceManagerRunner.getResourceManageGateway(),
blobServer,
heartbeatServices,
jobManagerMetricGroup,
metricRegistry.getMetricQueryServicePath(),
new MemoryArchivedExecutionGraphStore(),
Dispatcher.DefaultJobManagerRunnerFactory.INSTANCE,
new ShutDownFatalErrorHandler(),
dispatcherRestEndpoint.getRestBaseUrl(),
historyServerArchivist);

// 启动基本的调度分发服务(其内部持有jobmaster去进行具体的任务执行与分发)
dispatcher.start();

resourceManagerLeaderRetriever = haServices.getResourceManagerLeaderRetriever();
dispatcherLeaderRetriever = haServices.getDispatcherLeaderRetriever();

resourceManagerLeaderRetriever.start(resourceManagerGatewayRetriever);
dispatcherLeaderRetriever.start(dispatcherGatewayRetriever);
}
catch (Exception e) {
// cleanup everything
try {
close();
} catch (Exception ee) {
e.addSuppressed(ee);
}
throw e;
}

// create a new termination future
terminationFuture = new CompletableFuture<>();

// now officially mark this as running
running = true;

LOG.info("Flink Mini Cluster started successfully");
}
}

HighAvailabilityServices

HighAvailabilityServicesUtils 是创建 HighAvailabilityServices 的工具类,其主要通过配置 config 中的 high-availability 选项来进行具体高可用服务组件的选择及实例化;
其通过工厂设计模式来进行具体对象的实例化;主要分为三类:

  • NONE:EmbeddedHaServices
  • ZOOKEEPER:ZooKeeperHaServices
  • FACTORY_CLASS:自定义实现 (在配置中指定对应的 className)

在没有配置 HA 的情况下会创建 EmbeddedHaServices
EmbeddedHaServices 不具备高可用的特性,适用于 ResourceMangaerTaksManagerJobManager 等所有组件都运行在同一个进程的情况。
EmbeddedHaService 为各组件创建的选举服务为 EmbeddedLeaderElectionService,一旦有参与选举的 LeaderContender 加入,该 contender 就被选择为 leader

1
2
3
4
5
6
7
8
9
10
11
12
13
14
15
16
17
18
19
20
21
22
23
24
25
public static HighAvailabilityServices createAvailableOrEmbeddedServices(Configuration config, Executor executor) throws Exception {
// 选择对应的ha模式
HighAvailabilityMode highAvailabilityMode = LeaderRetrievalUtils.getRecoveryMode(config);

switch (highAvailabilityMode) {
case NONE:
return new EmbeddedHaServices(executor);

case ZOOKEEPER:
BlobStoreService blobStoreService = BlobUtils.createBlobStoreFromConfig(config);

return new ZooKeeperHaServices(
ZooKeeperUtils.startCuratorFramework(config),
executor,
config,
blobStoreService);

case FACTORY_CLASS:
return createCustomHAServices(config, executor);

default:
throw new Exception("High availability mode " + highAvailabilityMode + " is not supported.");

}
}

EmbeddedHaServices高可用服务 其内部主要用于保存对应组件的leaderService服务; 其内部主要保存以下几种组件ha服务(不同EmbeddedLeaderService实例)
// 用于RM选举相关
private final EmbeddedLeaderService resourceManagerLeaderService;
// 用于dispatcher选举相关
private final EmbeddedLeaderService dispatcherLeaderService;
// 用于JobManager选举相关;一个job任务对应一个
private final HashMap<JobID, EmbeddedLeaderService> jobManagerLeaderServices;
// Webmonitor
private final EmbeddedLeaderService webMonitorLeaderService;

其中 ha 最主要相关的两个服务:

1、LeaderElectionService 用于组件参与 leader 选举 (其相关的接口如下);
start 方法就是将当前的组件加入 Leader 选举;
当某个组件被选举为 leader 时,会回调该组件实现的 grantLeadership 方法 (第一次被选举为 leader),
当某个组件不再是 leader 时,会回调该组件实现的 revokeLeadership 方法。

1
2
3
4
5
6
7
8
9
10
11
12
public interface LeaderElectionService {
void start(LeaderContender contender) throws Exception; // 将当前组件加入到leader选举
void stop() throws Exception;
void confirmLeaderSessionID(UUID leaderSessionID);
boolean hasLeadership(@Nonnull UUID leaderSessionId);
}
public interface LeaderContender {
void grantLeadership(UUID leaderSessionID);
void revokeLeadership();
String getAddress();
void handleError(Exception exception);
}

2、LeaderRetrievalListener 用于 leader 改变后通知回调
其主要用于获取其他组件 Leader 的功能LeaderRetrievalService 非常简洁,
提供了 startstop 方法,并且 start 方法只能被调用一次,在 ZK 模式中因为它只会监听一条 ZK 上的路径 (即一个组件的变化);

1
2
3
4
5
6
7
8
public interface LeaderRetrievalService {
void start(LeaderRetrievalListener listener) throws Exception;
void stop() throws Exception;
}
public interface LeaderRetrievalListener {
void notifyLeaderAddress(@Nullable String leaderAddress, @Nullable UUID leaderSessionID);
void handleError(Exception exception);
}

其部分运行 debug 实例示例如下:

2、ResourceManager

在创建 HighAvailabilityServices 之后,就会启动 ResourceManagerResourceManagerRunner#startResourceManager 会创建 ResourceManager 和对应的 ResourceManagerRuntimeServices
其中 ResourceManagerRuntimeServices 主要工作类似于工厂类;
其主要负责 SlotManagerJobLeaderIdService 服务的初始化实例创建,
(其中 JobLeaderIdService 服务主要作用是为每个 job 任务选择出对应 ha 可用的 JobMaster,并将该 job 任务分配该 JobMatser)

1
2
3
4
5
6
7
8
9
10
11
12
13
14
15
16
17
18
JobLeaderIdService#addJob()
/**
* Add a job to be monitored to retrieve the job leader id.
* 添加要监控的作业以检索作业领导者ID
* @param jobId identifying the job to monitor
* @throws Exception if the job could not be added to the service
*/
public void addJob(JobID jobId) throws Exception {
Preconditions.checkNotNull(jobLeaderIdActions);
LOG.debug("Add job {} to job leader id monitoring.", jobId);

if (!jobLeaderIdListeners.containsKey(jobId)) {
// 从ha中选择出合适的leader
LeaderRetrievalService leaderRetrievalService = highAvailabilityServices.getJobManagerLeaderRetriever(jobId);

JobLeaderIdListener jobIdListener = new JobLeaderIdListener(jobId, jobLeaderIdActions, leaderRetrievalService);
jobLeaderIdListeners.put(jobId, jobIdListener);
}}

ResourceManager 资源管理器其继承了 FencedRpcEndpoint 实现了 RPC 服务,其内部组件主要包含:

  1. 上诉的 SlotManagerJobLeaderIdService 服务、高可用 leader 选举服务 leaderElectionService
  2. 心跳管理器 taskManagerHeartbeatManagerjobManagerHeartbeatManager
  3. 指标监控服务 MetricRegistry
  4. 所有已注册的 TaskExecutors

之后其会调用 ResourceManager#start() 方法来启动此 RM
ResourceManager 启动的回调函数中,会通过 HighAvailabilityServices 获取到选举服务,从而参与到选举之中。
并启动 JobLeaderIdService,管理向当前 ResourceManager 注册的作业的leader id
其主要启动服务内容如下:

1
2
3
4
5
6
7
8
9
10
11
12
13
14
15
16
17
18
19
20
21
22
23
24
25
26
27
28
29
ResourceManager#start()方法:
public void start() throws Exception {
// start a leader
// 调用父类RPC接口;以此启动RPC服务
super.start();

// 可用的ha leader选举服务
leaderElectionService = highAvailabilityServices.getResourceManagerLeaderElectionService();

// 初始化 do nothing;不做任何操作
initialize();

try {
// 将该RM加入并选举作为leader;
// 并在里面启动SlotManager相关的周期性超时检测线程(主要包括checkTaskManagerTimeouts、checkSlotRequestTimeouts)
leaderElectionService.start(this);
} catch (Exception e) {
throw new ResourceManagerException("Could not start the leader election service.", e);
}

try {
jobLeaderIdService.start(new JobLeaderIdActionsImpl());
} catch (Exception e) {
throw new ResourceManagerException("Could not start the job leader id service.", e);
}

// 添加slots指标监控,taskSlotsAvailable、taskSlotsTotal、numRegisteredTaskManagers
registerSlotAndTaskExecutorMetrics();
}

3、TaskExecutor

之后便是启动对应的 TaskManager,TaskManager 的启动流程类似于 ResourceManager,也是委托给 TaskManagerRunner#startTaskManager();TaskManagerRunner 内部的主要工作包括参数校验和初始化组件如下:

  1. 先初始化 config 参数配置,主要包括 network、memory、JVM 内存或堆外内存等等
  2. 其次启动对应的 network、I/O manager、memory manager、BroadcastVariableManager、TaskSlotTable、JobManagerTable、TaskExecutorLocalStateStoresManager 等等
  3. 最终根据上诉的内部组件启动 TaskExecutor 实例

TaskExecutor 任务管理器也继承了 RpcEndpoint 实现了 RPC 服务;其主要的内部组件包含 (其实也就是 TaskManagerRunner 初始化的组件):

  1. 高可用服务 HighAvailabilityServices
  2. 心跳管理器 jobManagerHeartbeatManager、resourceManagerHeartbeatManager
  3. 上诉对应的 network、I/O manager、memory manager、BroadcastVariableManager、TaskSlotTable、JobManagerTable、TaskExecutorLocalStateStoresManager 等等组件
  4. 其次会和 ResourceManager 建立连接 EstablishedResourceManagerConnectionTaskExecutorToResourceManagerConnection;(在 TM#start() 的时候建立)
    以及和对应 JobManager 建立的连接 jobManagerConnections

之后其会调用 TaskManager#start() 方法来启动此 TM;在 TaskManager 启动的回调函数中,会通过 HighAvailabilityServices 获取到选举服务,从而参与到选举之中。并启动 JobLeaderIdService,管理向当前 ResourceManager 注册的作业的 leader id。其主要启动服务内容如下:

TaskExecutor#start()方法:

1
2
3
4
5
6
7
8
9
10
11
12
13
14
15
16
17
18
19
20
21
22
23
24
25
public void start() throws Exception {
super.start(); // 调用父类RPC接口;以此启动RPC服务

// start by connecting to the ResourceManager
try {
// 采用LeaderRetrievalService进行选举出leader后的回调通知;其会调用listener中的notifyLeaderAddress()方法;
// 进行RM的连接; 向RM注册自己以及建立相关的心跳连接;建立连接(resourceManagerConnection = new TaskExecutorToResourceManagerConnection(......., ResourceManagerRegistrationListener))
// 其在连接建立成功之后;会通过ResourceManagerRegistrationListener监听RM连接成功回调函数进行 将slot资源通过RPC向RM进行上报
resourceManagerLeaderRetriever.start(new ResourceManagerLeaderListener());
} catch (Exception e) {
onFatalError(e);
}

// tell the task slot table who's responsible for the task slot actions //
taskSlotTable.start(new SlotActionsImpl());

// start the job leader service
// 开启jobLeaderService服务并添加回调监听;等待jobmanager参与leader选举,监听回调JobLeaderListenerImpl进行establishJobManagerConnection
// 也向其jobmanager提供其管理的job任务jobId对应申请的slot资源状态;offerSlotsToJobManager(jobId);
jobLeaderService.start(getAddress(), getRpcService(), haServices, new JobLeaderListenerImpl()); //

fileCache = new FileCache(taskManagerConfiguration.getTmpDirectories(), blobCacheService.getPermanentBlobService());

startRegistrationTimeout();
}

其连接主要是通过 LeaderRetrievalListener 来进行的,首先其会注册自己的监听器 ResourceManagerLeaderListener,之后便等待 leader 选举并发送执行 NotifyOfLeaderCall 通知;其会调用对应注册监听器 ResourceManagerLeaderListener 的 listener.notifyLeaderAddress(); 方法产生回调;一旦获取 ResourceManager 的 leader 被确定以及 Call 通知之后,就可以获取到 ResourceManager 对应的 RpcGateway,之后便会异步的与对应的 RM 建立连接 reconnectToResourceManager;在成功建立连接到 RM 之后,便会通过 RPC 异步的调用 resourceManager.registerTaskExecutor();向 RM 注册自己以及建立相关的心跳连接;在注册成功之后,其注册成功信息会通过 ResourceManagerRegistrationListener 监听函数异步回调;向 RM 上报自己的 slot 资源;

1
2
3
4
5
6
7
8
9
10
11
12
13
14
15
16
17
18
19
20
21
22
23
24
25
26
27
28
29
30
31
32
33
34
35
36
37
38
39
40
41
42
43
44
45
46
47
48
49
50
51
52
53
54
55
56
57
58
59
60
61
62
63
64
65
66
67
68
69
70
71
72
73
74
75
76
/**
* The listener for leader changes of the resource manager.
*/
private final class ResourceManagerLeaderListener implements LeaderRetrievalListener {
@Override
public void notifyLeaderAddress(final String leaderAddress, final UUID leaderSessionID) {
// 获得ResourceManager的地址, 和ResourceManager建立连接(主要是TaskExecutorToResourceManagerConnection和EstablishedResourceManagerConnection)
runAsync(

() -> notifyOfNewResourceManagerLeader(
leaderAddress,
ResourceManagerId.fromUuidOrNull(leaderSessionID)));
}

@Override
public void handleError(Exception exception) {
onFatalError(exception);
}
}

private RetryingRegistration<F, G, S> createNewRegistration() {
// 创建生成对应的注册连接;该处为TaskExecutorToResourceManagerConnection.ResourceManagerRegistration
RetryingRegistration<F, G, S> newRegistration = checkNotNull(generateRegistration());

CompletableFuture<Tuple2<G, S>> future = newRegistration.getFuture();

future.whenCompleteAsync(
(Tuple2<G, S> result, Throwable failure) -> {
if (failure != null) {
if (failure instanceof CancellationException) {
// we ignore cancellation exceptions because they originate from cancelling
// the RetryingRegistration
log.debug("Retrying registration towards {} was cancelled.", targetAddress);
} else {
// this future should only ever fail if there is a bug, not if the registration is declined
onRegistrationFailure(failure);
}
} else {
targetGateway = result.f0;
// 成功后异步回调执行connection连接确认及TM slot资源上报
// 其异步注册的监听器为ResourceManagerRegistrationListener
onRegistrationSuccess(result.f1);
}
}, executor);

return newRegistration;
}

// 向RM的注册
public void startRegistration() {
try {
// trigger resolution of the resource manager address to a callable gateway
final CompletableFuture<G> resourceManagerFuture;

if (FencedRpcGateway.class.isAssignableFrom(targetType)) {
resourceManagerFuture = (CompletableFuture<G>) rpcService.connect( // rpc连接
targetAddress,
fencingToken,
targetType.asSubclass(FencedRpcGateway.class));
} else {
resourceManagerFuture = rpcService.connect(targetAddress, targetType);
}

// upon success, start the registration attempts
CompletableFuture<Void> resourceManagerAcceptFuture = resourceManagerFuture.thenAcceptAsync(
(G result) -> {
log.info("Resolved {} address, beginning registration", targetName);
register(result, 1, initialRegistrationTimeout);
//注册主体
// 其会调用ResourceManagerRegistration#invokeRegistration()来进行实际的注册
},
rpcService.getExecutor());

// upon failure, retry, unless this is cancelled
...... // 注册失败会重试
}

4、DispatcherRestEndpoint、WebMonitorEndpoint

web 界面展示接口相关,其主要初始化 web 相关的服务及接口;主要包括 jobmanager、taskmanager 信息及日志监控、web job submit 初始化、metric 监控指标、checkpoint 检查点、savepoint 保存点等等 web 界面可查询到的指标;并且将服务以 netty 其 handler 以及接口初始化 log 日志信息如下 (部分):

1
2
3
4
5
6
7
8
9
10
11
12
13
14
15
16
17
18
19
20
21
22
23
24
25
26
27
28
29
30
31
DEBUG: org.apache.flink.runtime.dispatcher.DispatcherRestEndpoint - Register handler org.apache.flink.runtime.rest.handler.cluster.ClusterConfigHandler@48f4713c under GET@/jobmanager/config.
DEBUG: org.apache.flink.runtime.dispatcher.DispatcherRestEndpoint - Register handler org.apache.flink.runtime.rest.handler.job.metrics.JobManagerMetricsHandler@4ba6ec50 under GET@/jobmanager/metrics.
DEBUG: org.apache.flink.runtime.dispatcher.DispatcherRestEndpoint - Register handler org.apache.flink.runtime.rest.handler.legacy.ConstantTextHandler@642413d4 under GET@/v1/jobmanager/stdout.
DEBUG: org.apache.flink.runtime.dispatcher.DispatcherRestEndpoint - Register handler org.apache.flink.runtime.rest.handler.job.JobIdsHandler@fb2e3fd under GET@/v1/jobs.
DEBUG: org.apache.flink.runtime.dispatcher.DispatcherRestEndpoint - Register handler org.apache.flink.runtime.rest.handler.job.JobSubmitHandler@43a09ce2 under POST@/jobs.
DEBUG: org.apache.flink.runtime.dispatcher.DispatcherRestEndpoint - Register handler org.apache.flink.runtime.rest.handler.job.metrics.AggregatingJobsMetricsHandler@3f183caa under GET@/v1/jobs/metrics.
DEBUG: org.apache.flink.runtime.dispatcher.DispatcherRestEndpoint - Register handler org.apache.flink.runtime.rest.handler.job.JobsOverviewHandler@7b66322e under GET@/v1/jobs/overview.
DEBUG: org.apache.flink.runtime.dispatcher.DispatcherRestEndpoint - Register handler org.apache.flink.runtime.rest.handler.job.JobDetailsHandler@63538bb4 under GET@/v1/jobs/:jobid.
DEBUG: org.apache.flink.runtime.dispatcher.DispatcherRestEndpoint - Register handler org.apache.flink.runtime.rest.handler.job.JobAccumulatorsHandler@5a50d9fc under GET@/v1/jobs/:jobid/accumulators.
DEBUG: org.apache.flink.runtime.dispatcher.DispatcherRestEndpoint - Register handler org.apache.flink.runtime.rest.handler.job.checkpoints.CheckpointingStatisticsHandler@106d77da under GET@/v1/jobs/:jobid/checkpoints.
DEBUG: org.apache.flink.runtime.dispatcher.DispatcherRestEndpoint - Register handler org.apache.flink.runtime.rest.handler.job.JobConfigHandler@767f6ee7 under GET@/v1/jobs/:jobid/config.
DEBUG: org.apache.flink.runtime.dispatcher.DispatcherRestEndpoint - Register handler org.apache.flink.runtime.rest.handler.job.JobExceptionsHandler@7b6c6e70 under GET@/jobs/:jobid/exceptions.
DEBUG: org.apache.flink.runtime.dispatcher.DispatcherRestEndpoint - Register handler org.apache.flink.runtime.rest.handler.job.metrics.JobMetricsHandler@3a894088 under GET@/jobs/:jobid/metrics.
DEBUG: org.apache.flink.runtime.dispatcher.DispatcherRestEndpoint - Register handler org.apache.flink.runtime.rest.handler.job.JobPlanHandler@370c1968 under GET@/jobs/:jobid/plan.
DEBUG: org.apache.flink.runtime.dispatcher.DispatcherRestEndpoint - Register handler org.apache.flink.runtime.rest.handler.job.savepoints.SavepointHandlers$SavepointStatusHandler@15eb0ae9 under GET@/jobs/:jobid/savepoints/:triggerid.
DEBUG: org.apache.flink.runtime.dispatcher.DispatcherRestEndpoint - Register handler org.apache.flink.runtime.rest.handler.job.JobVertexDetailsHandler@65e0b505 under GET@/jobs/:jobid/vertices/:vertexid.
DEBUG: org.apache.flink.runtime.dispatcher.DispatcherRestEndpoint - Register handler org.apache.flink.runtime.rest.handler.job.JobVertexAccumulatorsHandler@67de7a99 under GET@/jobs/:jobid/vertices/:vertexid/accumulators.
DEBUG: org.apache.flink.runtime.dispatcher.DispatcherRestEndpoint - Register handler org.apache.flink.runtime.rest.handler.job.JobVertexBackPressureHandler@795f5d51 under GET@/jobs/:jobid/vertices/:vertexid/backpressure.
DEBUG: org.apache.flink.runtime.dispatcher.DispatcherRestEndpoint - Register handler org.apache.flink.runtime.rest.handler.job.metrics.JobVertexMetricsHandler@34aeacd1 under GET@/jobs/:jobid/vertices/:vertexid/metrics.
DEBUG: org.apache.flink.runtime.dispatcher.DispatcherRestEndpoint - Register handler org.apache.flink.runtime.rest.handler.job.metrics.AggregatingSubtasksMetricsHandler@4098dd77 under GET@/jobs/:jobid/vertices/:vertexid/subtasks/metrics.
DEBUG: org.apache.flink.runtime.dispatcher.DispatcherRestEndpoint - Register handler org.apache.flink.runtime.rest.handler.job.SubtaskCurrentAttemptDetailsHandler@43aeb5e0 under GET@/jobs/:jobid/vertices/:vertexid/subtasks/:subtaskindex.
DEBUG: org.apache.flink.runtime.dispatcher.DispatcherRestEndpoint - Register handler org.apache.flink.runtime.rest.handler.job.SubtaskExecutionAttemptDetailsHandler@2274160 under GET@/jobs/:jobid/vertices/:vertexid/subtasks/:subtaskindex/attempts/:attempt.
DEBUG: org.apache.flink.runtime.dispatcher.DispatcherRestEndpoint - Register handler org.apache.flink.runtime.rest.handler.job.SubtaskExecutionAttemptAccumulatorsHandler@65383667 under GET@/jobs/:jobid/vertices/:vertexid/subtasks/:subtaskindex/attempts/:attempt/accumulators.
DEBUG: org.apache.flink.runtime.dispatcher.DispatcherRestEndpoint - Register handler org.apache.flink.runtime.rest.handler.job.metrics.SubtaskMetricsHandler@63cd2cd2 under GET@/jobs/:jobid/vertices/:vertexid/subtasks/:subtaskindex/metrics.
DEBUG: org.apache.flink.runtime.dispatcher.DispatcherRestEndpoint - Register handler org.apache.flink.runtime.rest.handler.job.SubtasksTimesHandler@557a84fe under GET@/jobs/:jobid/vertices/:vertexid/subtasktimes.
DEBUG: org.apache.flink.runtime.dispatcher.DispatcherRestEndpoint - Register handler org.apache.flink.runtime.rest.handler.job.JobVertexTaskManagersHandler@6deee370 under GET@/jobs/:jobid/vertices/:vertexid/taskmanagers.
DEBUG: org.apache.flink.runtime.dispatcher.DispatcherRestEndpoint - Register handler org.apache.flink.runtime.rest.handler.job.savepoints.SavepointDisposalHandlers$SavepointDisposalTriggerHandler@423c5404 under POST@/savepoint-disposal.
DEBUG: org.apache.flink.runtime.dispatcher.DispatcherRestEndpoint - Register handler org.apache.flink.runtime.rest.handler.job.metrics.AggregatingTaskManagersMetricsHandler@5a02bfe3 under GET@/taskmanagers/metrics.
DEBUG: org.apache.flink.runtime.dispatcher.DispatcherRestEndpoint - Register handler org.apache.flink.runtime.rest.handler.taskmanager.TaskManagerLogFileHandler@3c79088e under GET@/taskmanagers/:taskmanagerid/log.
DEBUG: org.apache.flink.runtime.dispatcher.DispatcherRestEndpoint - Register handler org.apache.flink.runtime.rest.handler.job.metrics.TaskManagerMetricsHandler@4a37191a under GET@/taskmanagers/:taskmanagerid/metrics.
DEBUG: org.apache.flink.runtime.dispatcher.DispatcherRestEndpoint - Register handler org.apache.flink.runtime.rest.handler.taskmanager.TaskManagerStdoutFileHandler@5854a18 under GET@/taskmanagers/:taskmanagerid/stdout.

5、StandaloneDispatcher

在 MiniCluster 模式下,其会创建一个 StandaloneDispatcher,该类继承自 Dispatcher;其是任务调度执行分发的基类,主要作用是提交任务到 JobManager,持久化存储,异常恢复任务等等;其主要的组件为:

  • RPC 服务、blobServer、heartbeatServices 等;
  • archivedExecutionGraphStore(用于 ExecutionGraph 的存储)
  • jobManagerRunnerFactory 工厂类 (该工厂类主要用于实例化 JobManagerRunner,该类内部持有具体需要执行的 jobGraph、jobMaster 等组件)

在实例化 JobManagerRunner 过程中;其会生成对应的 jobMaster;其 jobmaster 对应的作用是 (核心主体):

  1. 工作图的调度执行和管理
  2. 资源管理(Leader、Gateway、心跳等)
  3. 任务管理
  4. 调度分配
  5. BackPressure 控制

在构建完成之后;会调用其 dispatcher.start() 方法;启动并注册自己的回调函数,其当前的 Dispatcher 也会通过 LeaderElectionService 参与选举。

1
2
3
4
5
6
7
8
9
10
11
Dispatcher#start()
public void start() throws Exception {
// 启动rpc服务
super.start();

submittedJobGraphStore.start(this);
// 当前组件参与leader选举
leaderElectionService.start(this);

registerDispatcherMetrics(jobManagerMetricGroup);
}

6、提交 JobGraph

在 MiniCluster 构建完成之后,其会通过 MiniCluster#executeJobBlocking 来提交 JobGraph 并等待运行完成,提交 JobGraph 和请求运行结果的逻辑如下,都是通过 RPC 调用来实现,其会先通过 RPC 调用向 Dispatcher 提交 JobGraph,之后便异步等待任务执行结果:

在 MiniCluster 构建完成之后,其会通过 MiniCluster#executeJobBlocking 来提交 JobGraph 并等待运行完成,提交 JobGraph 和请求运行结果的逻辑如下,都是通过 RPC 调用来实现,其会先通过 RPC 调用向 Dispatcher 提交 JobGraph,之后便异步等待任务执行结果:

1
2
3
4
5
6
7
8
9
10
11
12
13
14
15
16
17
18
19
20
21
22
23
24
25
26
MiniCluster#executeJobBlocking
public JobExecutionResult executeJobBlocking(JobGraph job) throws JobExecutionException, InterruptedException {
checkNotNull(job, "job is null");

// 提交任务
final CompletableFuture<JobSubmissionResult> submissionFuture = submitJob(job);

// 请求job任务状态
final CompletableFuture<JobResult> jobResultFuture = submissionFuture.thenCompose(
(JobSubmissionResult ignored) -> requestJobResult(job.getJobID()));

final JobResult jobResult;

try {
// 获取异步结果并返回
jobResult = jobResultFuture.get();
} catch (ExecutionException e) {
throw new JobExecutionException(job.getJobID(), "Could not retrieve JobResult.", ExceptionUtils.stripExecutionException(e));
}

try {
return jobResult.toJobExecutionResult(Thread.currentThread().getContextClassLoader());
} catch (IOException | ClassNotFoundException e) {
throw new JobExecutionException(job.getJobID(), e);
}
}

其主要的 submitJob 执行流程如下 (通过 RPC 调用 dispatcherGateway.submitJob(jobGraph, rpcTimeout) 向 Dispatcher 提交 JobGraph):

1
2
3
4
5
6
7
8
9
10
11
12
13
14
15
16
17
18
19
20
21
22
23
24
25
public CompletableFuture<JobSubmissionResult> submitJob(JobGraph jobGraph) {
final DispatcherGateway dispatcherGateway;
try {
// 通过Dispatcher的gateway retriever获取DispatcherGateway
dispatcherGateway = getDispatcherGateway();
} catch (LeaderRetrievalException | InterruptedException e) {
ExceptionUtils.checkInterrupted(e);
return FutureUtils.completedExceptionally(e);
}

// we have to allow queued scheduling in Flip-6 mode because we need to request slots
// from the ResourceManager
jobGraph.setAllowQueuedScheduling(true);

final CompletableFuture<InetSocketAddress> blobServerAddressFuture = createBlobServerAddress(dispatcherGateway);

final CompletableFuture<Void> jarUploadFuture = uploadAndSetJobFiles(blobServerAddressFuture, jobGraph);

// 通过RPC调用向Dispatcher提交JobGraph
final CompletableFuture<Acknowledge> acknowledgeCompletableFuture = jarUploadFuture.thenCompose(
(Void ack) -> dispatcherGateway.submitJob(jobGraph, rpcTimeout));

return acknowledgeCompletableFuture.thenApply(
(Acknowledge ignored) -> new JobSubmissionResult(jobGraph.getJobID()));
}

Dispatcher 在接收到提交 JobGraph 的请求后,会将提交的 JobGraph 保存在 SubmittedJobGraphStore 中 (用于故障恢复),并为提交的 JobGraph 启动 JobManager:

  1. Dispatcher 接手 job 之后,会实例化一个 JobManagerRunner,然后用这个 runner 启动 job;
  2. JobManagerRunner 接下来把 job 交给了 JobMaster 去处理;
  3. JobMaster 使用 ExecutionGraph 的方法启动了整个执行图;整个任务就启动起来了。
1
2
3
4
5
6
7
8
9
10
11
12
13
14
15
16
17
18
19
20
21
22
23
24
25
26
27
28
29
30
31
32
33
34
35
36
37
38
39
40
41
42
43
44
45
46
47
48
49
50
51
// 创建JobManagerRunner(实例化JobMaster); 并启动该JobManagerRunner
Dispatcher#createJobManagerRunner(jobGraph)
private CompletableFuture<JobManagerRunner> createJobManagerRunner(JobGraph jobGraph) {
final RpcService rpcService = getRpcService();

final CompletableFuture<JobManagerRunner> jobManagerRunnerFuture = CompletableFuture.supplyAsync(
CheckedSupplier.unchecked(() ->
jobManagerRunnerFactory.createJobManagerRunner(
ResourceID.generate(),
jobGraph,
configuration,
rpcService,
highAvailabilityServices,
heartbeatServices,
blobServer,
jobManagerSharedServices,
new DefaultJobManagerJobMetricGroupFactory(jobManagerMetricGroup),
fatalErrorHandler)),
rpcService.getExecutor());

// 启动的JobManagerRunner会竞争leader,一旦被选举为leader,其就会调用verifyJobSchedulingStatusAndStartJobManager;
// 就会启动执行jobMaster.start(); 在jobMaster内部分别启动slotPool超时监控线程、建立和ResourceManager的ResourceManagerConnection连接;
// 一旦连接建立之后, JobMaster就可以通过RPC调用和ResourceManager进行通信了; 在此之后就进入了任务调度执行的流程
return jobManagerRunnerFuture.thenApply(FunctionUtils.uncheckedFunction(this::startJobManagerRunner));
}

JobManagerRunner#start()
public void start() throws Exception {
try {
leaderElectionService.start(this);
} catch (Exception e) {
log.error("Could not start the JobManager because the leader election service did not start.", e);
throw new Exception("Could not start the leader election service.", e);
}
}

JobMaster#startJobExecution#startJobMasterServices
private void startJobMasterServices() throws Exception {
// start the slot pool make sure the slot pool now accepts messages for this leader
slotPool.start(getFencingToken(), getAddress());

//TODO: Remove once the ZooKeeperLeaderRetrieval returns the stored address upon start
// try to reconnect to previously known leader
reconnectToResourceManager(new FlinkException("Starting JobMaster component."));

// job is ready to go, try to establish connection with resource manager
// - activate leader retrieval for the resource manager
// - on notification of the leader, the connection will be established and
// the slot pool will start requesting slots
resourceManagerLeaderRetriever.start(new ResourceManagerLeaderListener());
}

Standalone Cluster 模式的启动流程

在 windows 或者 linux 环境下通过 /flink/bin/start-cluster.bat 或者 start-cluster.sh 来启动对应的 flink 集群 Standalone Cluster 模式;

简化shell启动脚本后,其组件实例化入口类主要为下:

1
2
3
4
5
6
7
case $DAEMON in
(taskexecutor) CLASS_TO_RUN=org.apache.flink.runtime.taskexecutor.TaskManagerRunner
(zookeeper) CLASS_TO_RUN=org.apache.flink.runtime.zookeeper.FlinkZooKeeperQuorumPeer
(historyserver) CLASS_TO_RUN=org.apache.flink.runtime.webmonitor.history.HistoryServer
(standalonesession) CLASS_TO_RUN=org.apache.flink.runtime.entrypoint.StandaloneSessionClusterEntrypoint
(standalonejob) CLASS_TO_RUN=org.apache.flink.container.entrypoint.StandaloneJobClusterEntryPoint
esac

可以看到在 Standalone 模式下;Standalone Cluster 有两种启动方式,即 standalonesession 模式和 standalonejob 方式,它们主要区别在于 Dispatcher 的实现方式不同。standalonesession 模式的入口类是 StandaloneSessionClusterEntrypoint,继承自 SessionClusterEntrypoint;与此对应的是以 standalonejob 方式启动 JobManager 的入口类是 StandaloneJobClusterEntryPoint,继承自 JobClusterEntrypoint。它们都由公共父类 ClusterEntrypoint 派生而来,区别在于生成的 DispatcherResourceManagerComponent 不同。(此处主要讨论 standalonesession) 模式;

1
2
3
4
5
6
7
8
9
10
11
12
13
14
15
16
17
18
19
20
21
22
23
// StandaloneSessionClusterEntrypoint#main()函数
public static void main(String[] args) {
// startup checks and logging (启动log输出当前配置环境java及启动的jvm参数等基本信息)
EnvironmentInformation.logEnvironmentInfo(LOG, StandaloneSessionClusterEntrypoint.class.getSimpleName(), args);
SignalHandler.register(LOG);
JvmShutdownSafeguard.installAsShutdownHook(LOG);

EntrypointClusterConfiguration entrypointClusterConfiguration = null;
final CommandLineParser<EntrypointClusterConfiguration> commandLineParser = new CommandLineParser<>(new EntrypointClusterConfigurationParserFactory());

try {
entrypointClusterConfiguration = commandLineParser.parse(args);
} catch (FlinkParseException e) {
LOG.error("Could not parse command line arguments {}.", args, e);
commandLineParser.printHelp(StandaloneSessionClusterEntrypoint.class.getSimpleName());
System.exit(1);
}
// 配置加载当前 flink-conf.yaml 中的配置设置信息
Configuration configuration = loadConfiguration(entrypointClusterConfiguration);
StandaloneSessionClusterEntrypoint entrypoint = new StandaloneSessionClusterEntrypoint(configuration);
// Standalone Cluster模式启动
ClusterEntrypoint.runClusterEntrypoint(entrypoint);
}

在 ClusterEntrypoint.runClusterEntrypoint(entrypoint) 集群启动 JobManager 过程中;
其主要的源代码如下:

1
2
3
4
5
6
7
8
9
10
11
12
13
14
15
16
17
18
19
20
21
22
23
24
25
26
27
28
29
30
31
32
33
private void runCluster(Configuration configuration) throws Exception {
synchronized (lock) {
// 初始化基础的服务类,主要包括创建commonRpcService(基础rpc服务提供基础的ip:port), haServices, blobServer, heartbeatServices, metricRegistry监控服务等等
// 这里生成的HighAvailabilityServices区别于MiniCluster模式; 由于Standalone模式下各组件不在同一个进程中, 因而需要从配置中加载配置:
// 1、如果采用基于Zookeeper的HA模式,则创建ZooKeeperHaServices,基于zookeeper获取leader通信地址
// 2、如果没有配置HA, 则创建StandaloneHaServices, 并从配置文件中获取各组件的RPC地址信息(resourceManagerRpcUrl、dispatcherRpcUrl、jobManagerRpcUrl)。
initializeServices(configuration);

// write host information into configuration
configuration.setString(JobManagerOptions.ADDRESS, commonRpcService.getAddress());
configuration.setInteger(JobManagerOptions.PORT, commonRpcService.getPort());

// 生成DispatcherResourceManagerComponentFactory, 由具体子类实现
final DispatcherResourceManagerComponentFactory<?> dispatcherResourceManagerComponentFactory = createDispatcherResourceManagerComponentFactory(configuration);

// 创建DispatcherResourceManagerComponent, 其内部持有并启动ResourceManager, Dispatcher
clusterComponent = dispatcherResourceManagerComponentFactory.create(
configuration,
commonRpcService,
haServices,
blobServer,
heartbeatServices,
metricRegistry,
archivedExecutionGraphStore,
new AkkaQueryServiceRetriever(
metricQueryServiceActorSystem,
Time.milliseconds(configuration.getLong(WebOptions.TIMEOUT))),
this);

clusterComponent.getShutDownFuture().whenComplete(...); // 执行完成, 关闭各项服务

}
}

在生成具体的 DispatcherResourceManagerComponentFactory 类的过程中,其针对不同的 Standalone 模式交由其具体子类去实现;

  1. standalonesession 模式的入口类 StandaloneSessionClusterEntrypoint;其具体生成的工厂类委托给 SessionDispatcherResourceManagerComponentFactory,该工厂类内部持有对应的负责创建相应组件的细化工厂类;其对应的组件实例化工厂类为:SessionDispatcherFactory–>StandaloneDispatcher;
    StandaloneResourceManagerFactory–>StandaloneResourceManager;
    SessionRestEndpointFactory–>DispatcherRestEndpoint;

  2. standalonejob 方式的入口类 StandaloneJobClusterEntryPoint;其具体生成的工厂类委托给在 JobDispatcherResourceManagerComponentFactory,该工厂类内部持有对应的负责创建相应组件的细化工厂类;其对应的组件实例化工厂类为:JobDispatcherFactory–>MiniDispatcher;
    StandaloneResourceManagerFactory–>StandaloneResourceManager;
    JobRestEndpointFactory–>MiniDispatcherRestEndpoint;

    在 standalonejob 方式中;一个 MiniDispatcher 和一个 JobGraph 绑定,一旦绑定的 JobGraph 执行结束,则关闭 MiniDispatcher,进而停止 JobManager 进程

其后续的具体组件实例化创建以及组件服务启动都在 clusterComponent=dispatcherResourceManagerComponentFactory.create()中;主要创建以及启动的组件 (主要是 resourceManager、dispatcher、webMonitorEndpoint 组件) 如下,其各个组件具体启动方式、服务内部的启动流程以及作用和 MiniCluster 中的一致,这里不再赘述。

1
2
3
4
5
6
7
8
9
10
11
12
13
14
15
16
17
18
19
20
21
22
23
24
25
26
27
28
29
30
31
32
33
34
35
36
37
38
39
40
41
42
43
44
45
46
47
48
49
50
51
52
53
54
55
56
57
58
59
60
61
62
63
64
65
66
67
68
69
70
71
72
73
74
75
76
77
78
79
80
81
82
83
84
85
86
87
@Override
public DispatcherResourceManagerComponent<T> create(...) throws Exception {
......
LeaderRetrievalService dispatcherLeaderRetrievalService = null;
LeaderRetrievalService resourceManagerRetrievalService = null;
WebMonitorEndpoint<U> webMonitorEndpoint = null;
ResourceManager<?\> resourceManager = null;
JobManagerMetricGroup jobManagerMetricGroup = null;
T dispatcher = null;

try {
dispatcherLeaderRetrievalService = highAvailabilityServices.getDispatcherLeaderRetriever();
resourceManagerRetrievalService = highAvailabilityServices.getResourceManagerLeaderRetriever();

final LeaderGatewayRetriever<DispatcherGateway> dispatcherGatewayRetriever = new RpcGatewayRetriever<>(
rpcService,
DispatcherGateway.class,
DispatcherId::fromUuid,
10,
Time.milliseconds(50L));

final LeaderGatewayRetriever<ResourceManagerGateway> resourceManagerGatewayRetriever = new RpcGatewayRetriever<>(
rpcService,
ResourceManagerGateway.class,
ResourceManagerId::fromUuid,
10,
Time.milliseconds(50L));

webMonitorEndpoint = restEndpointFactory.createRestEndpoint();

log.debug("Starting Dispatcher REST endpoint.");
webMonitorEndpoint.start();

jobManagerMetricGroup = MetricUtils.instantiateJobManagerMetricGroup(
metricRegistry,
rpcService.getAddress(),
ConfigurationUtils.getSystemResourceMetricsProbingInterval(configuration));

resourceManager = resourceManagerFactory.createResourceManager(
configuration,
ResourceID.generate(),
rpcService,
highAvailabilityServices,
heartbeatServices,
metricRegistry,
fatalErrorHandler,
new ClusterInformation(rpcService.getAddress(), blobServer.getPort()),
webMonitorEndpoint.getRestBaseUrl(),
jobManagerMetricGroup);

final HistoryServerArchivist historyServerArchivist = HistoryServerArchivist.createHistoryServerArchivist(configuration, webMonitorEndpoint);

dispatcher = dispatcherFactory.createDispatcher(
configuration,
rpcService,
highAvailabilityServices,
resourceManager.getSelfGateway(ResourceManagerGateway.class),
blobServer,
heartbeatServices,
jobManagerMetricGroup,
metricRegistry.getMetricQueryServicePath(),
archivedExecutionGraphStore,
fatalErrorHandler,
webMonitorEndpoint.getRestBaseUrl(),
historyServerArchivist);

log.debug("Starting ResourceManager.");
resourceManager.start();
resourceManagerRetrievalService.start(resourceManagerGatewayRetriever);

log.debug("Starting Dispatcher.");
dispatcher.start();
dispatcherLeaderRetrievalService.start(dispatcherGatewayRetriever);

return createDispatcherResourceManagerComponent(
dispatcher,
resourceManager,
dispatcherLeaderRetrievalService,
resourceManagerRetrievalService,
webMonitorEndpoint,
jobManagerMetricGroup);

} catch (Exception exception) {
// clean up all started components
......
}
}

TaskManager 的启动

TaskManager 的启动入口在 CLASS_TO_RUN=org.apache.flink.runtime.taskexecutor.TaskManagerRunner 中,它的启动流程和 MiniCluster 模式下基本一致,从 flink-conf.yaml 文件中加载对应的 config 文件配置 (jobmanager 地址等等),启动对应的 TaskExecutor,并向 ResourceManager 注册自己;其和 MiniCluster 模式下的区别在于:

  1. 运行在独立的进程中;
  2. HighAvailabilityServices 的创建要依赖配置文件获取;
  3. TaskManagerRunner 会创建 TaskExecutor,TaskExecutor 通过 HighAvailabilityServices 获取 ResourceManager 的通信地址,并和 ResourceManager 建立连接;

Yarn Cluster 模式的启动流程:

Yarn Cluster 模式的启动入口在 FlinkYarnSessionCli 中;首先根据命令行参数 (–ship、jar、jobManagerMemory、container、slots 等等) 解析并创建对应的 YarnConfiguration;之后便创建 YarnClusterDescriptor(其内部持有 YarnClient 客户端、yarnConfiguration、JarPath 等等),接着调用 YarnClusterDescriptor#deploySessionCluster 来触发 Yarn Cluster 集群的部署;其实际上会调用启动 AbstractYarnClusterDescriptor#deployInternal 方法,主要就是通过 YarnClient 向 yarn 集群提交 AppMaster 应用,启动对应的 ApplicationMaster。

1
2
3
4
5
6
7
8
9
10
11
12
13
14
15
16
17
18
19
20
21
22
23
24
25
26
27
28
29
30
31
32
33
34
35
36
37
38
39
40
41
42
43
44
45
46
47
48
49
50
51
52
53
54
55
56
57
58
59
60
61
62
63
64
65
66
// AbstractYarnClusterDescriptor#deployInternal
protected ClusterClient<ApplicationId> deployInternal(
ClusterSpecification clusterSpecification,
String applicationName,
String yarnClusterEntrypoint,
@Nullable JobGraph jobGraph,
boolean detached) throws Exception {

// ------------------ Check if configuration is valid --------------------
validateClusterSpecification(clusterSpecification);

if (UserGroupInformation.isSecurityEnabled()) {......} // hasKerberos鉴权

isReadyForDeployment(clusterSpecification); // 配置及请求yarn最大资源检查

// ------------------ Check if the specified queue exists --------------------
checkYarnQueues(yarnClient); // yarn queue检查

// ------------------ Add dynamic properties to local flinkConfiguraton ------
Map<String, String\> dynProperties = getDynamicProperties(dynamicPropertiesEncoded);
for (Map.Entry<String, String\> dynProperty : dynProperties.entrySet()) {
flinkConfiguration.setString(dynProperty.getKey(), dynProperty.getValue());
}

// ------------------ Check if the YARN ClusterClient has the requested resources --------------

// Create application via yarnClient
final YarnClientApplication yarnApplication = yarnClient.createApplication(); // 创建申请Yarn AppMaster
final GetNewApplicationResponse appResponse = yarnApplication.getNewApplicationResponse();

......... // cluster资源检查

LOG.info("Cluster specification: {}", validClusterSpecification);

final ClusterEntrypoint.ExecutionMode executionMode = detached ? // 执行模式选择(是否长连接输出应用信息:提交后本地断开)
ClusterEntrypoint.ExecutionMode.DETACHED
: ClusterEntrypoint.ExecutionMode.NORMAL;

flinkConfiguration.setString(ClusterEntrypoint.EXECUTION_MODE, executionMode.toString());

// 启动Yarn AppMaster应用;在启动AppMaster过程中,主要是构建提交的应用上下文ApplicationSubmissionContext appContext = yarnApplication.getApplicationSubmissionContext();
// appContext里面定义了Yarn container启动的资源、jar、config等等信息;其中比较重要的是:
// ContainerLaunchContext amContainer = setupApplicationMasterContainer(); 里面设置了 启动Application Master进程的java cmd指令
// ContainerLaunchContext amContainer中指定了 启动的入口class类;该处分别指向YarnSessionClusterEntrypoint或者YarnJobClusterEntrypoint;
// 之后便调用yarnClient.submitApplication(appContext); 向Yarn提交该应用
ApplicationReport report = startAppMaster(
flinkConfiguration,
applicationName,
yarnClusterEntrypoint,
jobGraph,
yarnClient,
yarnApplication,
validClusterSpecification);

// Correctly initialize the Flink config
.........

// the Flink cluster is deployed in YARN. Represent cluster
return createYarnClusterClient(
this,
validClusterSpecification.getNumberTaskManagers(),
validClusterSpecification.getSlotsPerTaskManager(),
report,
flinkConfiguration,
true);
}

在 YarnCluster 模式下;根据 sessioncluster 和 jobcluster 者两种启动的区别,提交到 Yarn 中 ApplicationMatser 的入口类分别为 YarnSessionClusterEntrypoint 和 YarnJobClusterEntrypoint,其最终的父类都是继承自 ClusterEntrypoint,最终集群启动过程都是依托给 ClusterEntrypoint.runClusterEntrypoint(entrypoint) 中;其启动过程与上述 Standalone Cluster 过程一致。主要的区别点在于 Dispatcher 分别为 StandaloneDispatcher 和 MiniDispatcher。ResourceManager 的具体实现类为 YarnResourceManager。

和 Standalone Cluster 不同的是,Yarn Cluster 模式下启动的 Flink 集群,其 TaskManager 是由 YarnResourceManager 根据 JobMaster 的请求动态向 Yarn 的 ResourceManager 进行申请的。在 JobMaster 向 flink 其启动的内部组件的 ResourceManager 申请资源时,如果当前没有足够的资源分配,则 YarnResourceManager 会向 Yarn 集群的 ResourceManager 申请新的 container,并启动 TaskManager。

1
2
3
4
5
6
7
8
9
10
11
12
13
14
15
16
17
18
19
20
21
22
23
24
25
26
27
28
29
30
31
32
/**
* The yarn implementation of the resource manager. Used when the system is started
* via the resource framework YARN.
*/
// 其内部主要持有的组件 以及 向yarn申请新container的方法
public class YarnResourceManager extends ResourceManager<YarnWorkerNode\> implements AMRMClientAsync.CallbackHandler {
/** Default heartbeat interval between this resource manager and the YARN ResourceManager. */
private final int yarnHeartbeatIntervalMillis;
private final Configuration flinkConfig;
private final YarnConfiguration yarnConfig;

private final int numberOfTaskSlots;
private final int defaultTaskManagerMemoryMB;
private final int defaultCpus;

/** The heartbeat interval while the resource master is waiting for containers. */
private final int containerRequestHeartbeatIntervalMillis;

/** Client to communicate with the Resource Manager (YARN's master). */
private AMRMClientAsync<AMRMClient.ContainerRequest> resourceManagerClient; // Yarn ResourceManager Client

/** Client to communicate with the Node manager and launch TaskExecutor processes. */
private NMClient nodeManagerClient; //

/** The number of containers requested, but not yet granted. */
private int numPendingContainerRequests;

private final Map<ResourceProfile, Integer> resourcePriorities = new HashMap<>();
private final Collection<ResourceProfile> slotsPerWorker;
private final Resource resource;
......
}

申请到对应的 Container 资源后,通过 YarnRM 的回调函数,构建 TaskManager 启动命令以及 ContainerLaunchContext,以此来启动对应的 TaskExecutor:

1
2
3
4
5
6
7
8
9
10
11
12
13
14
15
16
17
18
19
20
21
22
23
24
25
26
27
28
29
30
31
32
33
34
35
36
37
38
39
40
41
42
43
44
45
46
47
48
49
50
51
52
53
54
55
56
57
58
59
60
61
62
63
64
65
66
67
68
69
70
71
72
73
74
75
76
77
78
79
80
81
82
83
84
85
86
87
88
89
90
91
92
93
94
95
96
97
98
99
100
101
102
103
104
105
106
107
108
109
110
// YarnResourceManager
// 向Yarn申请container
private void requestYarnContainer() {
resourceManagerClient.addContainerRequest(getContainerRequest());

// make sure we transmit the request fast and receive fast news of granted allocations
resourceManagerClient.setHeartbeatInterval(containerRequestHeartbeatIntervalMillis);
numPendingContainerRequests++;

log.info("Requesting new TaskExecutor container with resources {}. Number pending requests {}.",
resource,
numPendingContainerRequests);

}

// 申请到container资源后,异步回调
@Override
public void onContainersAllocated(List<Container> containers) {
runAsync(() -> {
final Collection<AMRMClient.ContainerRequest> pendingRequests = getPendingRequests();
final Iterator<AMRMClient.ContainerRequest> pendingRequestsIterator = pendingRequests.iterator();

for (Container container : containers) {
log.info(
"Received new container: {} - Remaining pending container requests: {}",
container.getId(),
numPendingContainerRequests);

if (numPendingContainerRequests > 0) {
removeContainerRequest(pendingRequestsIterator.next());

final String containerIdStr = container.getId().toString();
final ResourceID resourceId = new ResourceID(containerIdStr);

workerNodeMap.put(resourceId, new YarnWorkerNode(container));

try {
// Context information used to start a TaskExecutor Java process
// 构建TaskManager启动的ContainerLaunchContext信息
ContainerLaunchContext taskExecutorLaunchContext = createTaskExecutorLaunchContext(
container.getResource(),
containerIdStr,
container.getNodeId().getHost());
// 远程提交执行 启动TaskManager
nodeManagerClient.startContainer(container, taskExecutorLaunchContext);
} catch (Throwable t) {
log.error("Could not start TaskManager in container {}.", container.getId(), t);

// release the failed container
workerNodeMap.remove(resourceId);
resourceManagerClient.releaseAssignedContainer(container.getId());
// and ask for a new one
requestYarnContainerIfRequired();
}
} else {
// return the excessive containers
log.info("Returning excess container {}.", container.getId());
resourceManagerClient.releaseAssignedContainer(container.getId());
}
}

// if we are waiting for no further containers, we can go to the
// regular heartbeat interval
if (numPendingContainerRequests <= 0) {
resourceManagerClient.setHeartbeatInterval(yarnHeartbeatIntervalMillis);
}
});

}

// 构建TaskManager启动的ContainerLaunchContext信息(并指定container启动的类为YarnTaskExecutorRunner)
private ContainerLaunchContext createTaskExecutorLaunchContext(Resource resource, String containerId, String host)
throws Exception {
// init the ContainerLaunchContext
final String currDir = env.get(ApplicationConstants.Environment.PWD.key());

final ContaineredTaskManagerParameters taskManagerParameters =
ContaineredTaskManagerParameters.create(flinkConfig, resource.getMemory(), numberOfTaskSlots);

log.debug("TaskExecutor {} will be started with container size {} MB, JVM heap size {} MB, " +
"JVM direct memory limit {} MB",
containerId,
taskManagerParameters.taskManagerTotalMemoryMB(),
taskManagerParameters.taskManagerHeapSizeMB(),
taskManagerParameters.taskManagerDirectMemoryLimitMB());

Configuration taskManagerConfig = BootstrapTools.cloneConfiguration(flinkConfig);

log.debug("TaskManager configuration: {}", taskManagerConfig);

// 构建TaskManager的启动container上下文并指定启动类为:YarnTaskExecutorRunner
// 构建TaskManager进程启动的java cmd指令 java ${jvmmem} ${javaOps} -Dxxx class xxx 1> xxx/taskmanager.out 2> xxx/taskmanager.err
ContainerLaunchContext taskExecutorLaunchContext = Utils.createTaskExecutorContext(
flinkConfig,
yarnConfig,
env,
taskManagerParameters,
taskManagerConfig,
currDir,
YarnTaskExecutorRunner.class, // 入口类
log);

// set a special environment variable to uniquely identify this container
taskExecutorLaunchContext.getEnvironment()
.put(ENV_FLINK_CONTAINER_ID, containerId);
taskExecutorLaunchContext.getEnvironment()
.put(ENV_FLINK_NODE_ID, host);
return taskExecutorLaunchContext;

}

[TOC]

Impala

How does impala provide faster query response compared to hive

Impala = SQL on HDFS
Hive = SQL on Hadoop

impala darmon running on datanode
cache some of the data that is in HDFS

why fast

why Impala is faster than Hive in Query processing? Below are the some key points.

  • While processing SQL-like queries, Impala does not write intermediate results on disk(like in Hive MapReduce); instead full SQL processing is done in memory, which makes it faster.
  • With Impala, the query starts its execution instantly compared to MapReduce, which may take significant time to start processing larger SQL queries and this adds more time in processing.
  • Impala Query Planner uses smart algorithms to execute queries in multiple stages in parallel nodes to provide results faster, avoiding sorting and shuffle steps, which may be unnecessary in most of the cases.
  • Impala has information about each data block in HDFS, so when processing the query, it takes advantage of this knowledge to distribute queries more evenly in all DataNodes.
  • There exists Impala daemon, which runs on each DataNode. These are responsible for processing queries.When query submitted, impalad(Impala daemon) reads and writes to data file and parallelizes the query by distributing the work to all other Impala nodes in the Impala cluster.
  • Another key reason for fast performance is that Impala first generates assembly-level code for each query. The assembly code executes faster than any other code framework because while Impala queries are running natively in memory, having a framework will add additional delay in the execution due to the framework overhead.
  1. 在处理类似sql的查询时,Impala不会在磁盘上写入中间结果(如Hive MapReduce);相反,SQL处理完全是在内存中完成的,这使它更快。
  2. 不使用map/reduce, 将数据fork到jvm和流量穿透是非常昂贵的。Impala将查询任务分割成子任务,在数据所在的节点上,各个节点独立并行运行,最后再单个节点上汇总结果。
  3. 与MapReduce相比,Impala查询立即开始执行,MapReduce可能会花费大量时间来开始处理较大的SQL查询,这会增加处理时间。
  4. Impala Query Planner使用智能算法在并行节点中的多个stage执行查询,以更快地提供结果,避免sortinh和shuffle步骤,这在大多数情况下可能是不必要的。
  5. Impala拥有关于HDFS每个数据块的信息,因此在处理查询时,它利用这些知识在所有数据节点中更均匀地分布查询。
  6. 存在在每个DataNode上运行的Impala守护进程。它们负责处理查询。当提交查询时,impalad(Impala守护进程)对数据文件进行读写操作,并通过将工作分配给Impala集群中的所有其他Impala节点来并行化查询。
  7. 快速性能的另一个关键原因是Impala首先为每个查询生成汇编级别的代码。汇编代码的执行速度比任何其他代码框架都快,因为Impala查询在本机的内存中运行时,拥有一个框架会由于框架开销而增加额外的执行延迟。
  8. 它使用hdfs存储,对于大文件来说速度很快。它尽可能多地缓存查询、结果和数据。
  9. 它支持新的文件格式,如parquet,即列式存储格式。使用这种格式,数据扫描量更少

Impala在内存中的处理所有查询,因此节点上的内存限制肯定是一个因素。必须有足够的内存来支持生成的数据集,在复杂的连接操作期间,数据集可能会成倍增长。如果查询开始处理数据,结果数据集无法装入可用内存,则查询将失败。

disadvantage

  1. 不支持UDF和自定义序列化
  2. impala查询是HiveSQL的子集
  3. hive支持存储和查询,而impala只能查询

Impala doesn’t provide fault-tolerance compared to Hive

so if there is a problem during your query then it’s gone.

Definitely for ETL type of jobs where failure of one job would be costly I would recommend Hive, but Impala can be awesome for small ad-hoc queries, for example for data scientists or business analysts who just want to take a look and analyze some data without building robust jobs. Also from my personal experience, Impala is still not very mature, and I’ve seen some crashes sometimes when the amount of data is larger than available memory.

对于ETL类型的工作,如果一个工作的失败代价很高,我会推荐Hive,但是Impala对于小的特别查询来说可能是很棒的,例如对于那些只想查看和分析一些数据而不想构建健壮工作的数据科学家或业务分析师来说。从我个人的经验来看,Impala还不太成熟,有时当数据量超过可用内存时,我会看到一些崩溃。

This means if your join, sort, or group by didn’t fit in memory, Impala would just kill the query. No warning. Just dead. Hive would never do that because it’s underlying processing architecture has no problem doing that.

这就意味着,内存不能承载join sort或group运算,Impala会无告警的立即kill掉查询,直接失败。而hive离线处理架构可以轻松处理,不会死掉

MPP

Impala uses MPP(massively parallel processing) unlike Hive which uses MapReduce under the hood, which involves some initial overheads (as Charles sir has specified). Massively parallel processing is a type of computing that uses many separate CPUs running in parallel to execute a single program where each CPU has it’s own dedicated memory. The very fact that Impala, being MPP based, doesn’t involve the overheads of a MapReduce jobs viz. job setup and creation, slot assignment, split creation, map generation etc., makes it blazingly fast.

Impala提供了更快的响应,因为它使用了MPP(大规模并行处理),而Hive在底层使用了MapReduce,这涉及到一些初始开销(正如Charles sir所指定的)。大规模并行处理是一种计算类型,它使用许多单独的并行运行的CPU来执行单个程序,其中每个CPU都有自己的专用内存。Impala是基于MPP的,它不涉及MapReduce作业的开销,即作业设置和创建、插槽分配、分割创建、地图生成等,这使得它的运行速度非常快。

But that doesn’t mean that Impala is the solution to all your problems. Being highly memory intensive (MPP), it is not a good fit for tasks that require heavy data operations like joins etc., as you just can’t fit everything into the memory. This is where Hive is a better fit.

MPP 作为高度内存密集型的运算,因为无法将所有的数据放入内存,并不适合需要大数据量的操作(如join);反而Hive更适合

实时的对部分数据即时查询适合Impala,对大数据的批处理请求,适合Hive

Impala not always faster than hive

In my current job we used to make all the querys with Impala, the biggest query (like 800 million rows after 8 joins) was taking from 2 to 20 mins (depending if the tables where already on memory or not) I migrate that Query to Hive, partitioned the tables and create buckets on them, now it takes 3–4 mins, It may be a few more seconds than the best 2 mins with Impala but it’s much more fast if we consider that most of the time Impala takes 12–18 mins.

在我目前的工作中,使用Impala进行所有的查询,最大的查询(比如8个连接后的8亿行)需要2到20分钟(取决于表是否已经在内存中);我将该查询迁移到Hive,对表进行分区并在其上创建桶,现在需要3到4分钟,这可能比Impala最好的2分钟多几秒钟,但如果我们考虑Impala大部分时间需要12到18分钟,速度会快得多。

ClickHouse

官方文档

Clickhouse

offical website github
meetup backup

why do we need ClickHouse

  • 交互式查询
  • 持续追加数据

Hypothesis
If we have good enough column-oriented DBMS,
we could store all our data in non-aggregated form
(raw pageviews and sessions) and generate all the reports on the fly,
to allow infinite customization.
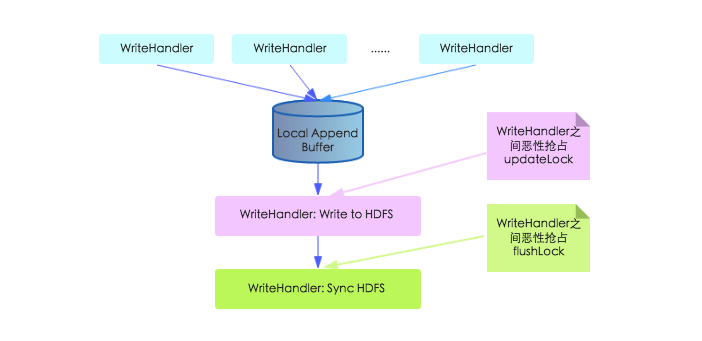
愿景:
足够好的列式DBMS,可以存储所有非聚合数据(原始的浏览数据和会话),可以在线生成所有的报告,拥有足够的个性化

yandex数据量

  • 30 trillions of rows (as of 2019)

  • 600 servers

  • total throughput of query processing is up to two terabytes per second

feature

  • column-oriented 列数存储
  • distributed 分布式
  • linearly scalable 线性扩展
  • fault-tolerant 容错
  • data ingestion in realtime 实时数据摄取
  • realtime (sub-second) queries 实时亚秒级查询
  • support of SQL dialect + extensions 支持SQL方言和扩展

why fast

High level architecture 架构

— Scale-out shared nothing; 横向伸缩无共享

— Massive Parallel Processing; MPP

Data storage optimizations 存储优化

— Column-oriented storage; 列式存储

— Merge Tree;

— Sparse index; 稀疏index

— Data compression; 数据压缩

Algorithmic optimizations 算法优化

Best algorithms in the world…
… are happy to be used in ClickHouse.

— Volnitsky substring search

— Hyperscan and RE2

— SIMD JSON

— HDR Histograms

— Roaring Bitmaps

Low-level optimizations 底层优化

Optimizations for CPU instruction sets
using SIMD processing. 使用SIMD优化CPU指令集

— SIMD text parsing

— SIMD data filtering

— SIMD decompression

— SIMD string operations

Specializations of algorithms…

… and attention to detail:

— uniq, uniqExact, uniqCombined, uniqUpTo;

— quantile, quantileTiming, quantileExact, quantileTDigest, quantileWeighted;

— 40+ specializations of GROUP BY;

— algorithms optimize itself for data distribution:
LZ4 decompression with Bayesian Bandits.

Interfaces

HTTP REST

clickhouse-client

JDBC, ODBC

(new) MySQL protocol compatibility

Python, PHP, Perl, Go,
Node.js, Ruby, C++, .NET, Scala, R, Julia, Rust

亿级流量 秒级统计

AI、ML、DL、ANN、CNN 蛰伏数十年,就为这个大数据时代。

AI正以前所未有的速度改变世界,影响着我们生活的方方面面,AI走进人们的生活将成为未来的新常态。
而大数据和计算能力像水和氧气一样支撑着AI,我们的数据从手机端、服务器日志